Querying whether it’s necessary to sand between coats of polyurethane is a perennial question, and you’ll hear many opinions online. The short answer is yes, you should. For some polyurethanes, it’s necessary, and for all polyurethanes, it’s recommended.
My experience with polyurethane began over 40 years ago when I used it to coat just about everything I created in wood. While my surface finish repertoire has expanded somewhat since then, I recall some terrible outcomes. My failures were down to two issues, impatience and not understanding some basic chemical facts about polyurethane.
I’ll run you through the for and against arguments regarding sanding in this article. Stay with me for the next few minutes, and I’ll lay out both sides of the story to allow you to decide which course of action to take.
Do you have to sand between coats of polyurethane?
The answer depends on the manufacturer and type of polyurethane you are using. Some manufacturers of water-based polyurethanes do not require sanding between coats as long as you observe specific recoating times. Most manufacturers of oil-based polyurethanes do require sanding between coats. However, aside from the technical aspects, you should consider sanding between coats for aesthetic reasons.
Why sanding between coats of polyurethane is necessary
There are two reasons you might sand polyurethane between coats. When recoating polyurethane, you want to ensure maximum adhesion between the coats. If the new coat does not integrate and stick to the old coat, you won’t get the life you expect from the surface finish. Over time, the layers will begin flaking off with expansion, contraction, and use. The surface protection is compromised, and your project will look unsightly.
Sanding between coats also removes brush marks, bubbles, dust, and surface imperfections on the previous coat. Giving each intermediate coat a light sand smooths the surface in preparation for the next coat and avoids locking in defects that detract from the final finish.
What happens if you don’t sand between coats
If you fail to sand polyurethane that requires it, you will compromise the adhesion between the coats. Instead of the coats combining, each dries independently, creating layers. Once your surface is in use and exposed to temperature and humidity changes, the layers will begin to delaminate, separating and flaking off in patches, making the surface rough and look unsightly while removing the surface protection. Instead of achieving a surface life of four to five years, you will find yourself reapplying the polyurethane in 12 to 18 months.
The surface finish will also be of lower quality. As wet coats of polyurethane dry, they pick up dust from the atmosphere, and bubbles or small imperfections develop. By the time you’ve applied three coats and failed to sand between each, the surface finish is rough when you run your hand over it, with a lower-quality appearance. While some people suggest that using a foam brush helps, this only assists in reducing brush marks; it does nothing for other sources of surface contamination and defects.
Related: How to Fix Common Polyurethane Mistakes
Do all types of polyurethane require sanding between coats?
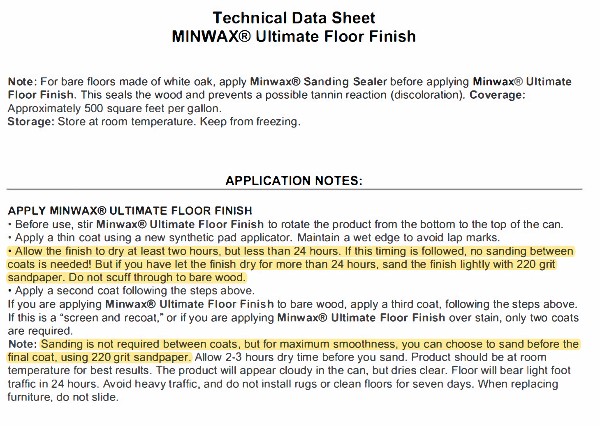
No, they don’t. As a general rule, you can get away without sanding between coats when using water-based products. However, a lot depends on your timing for recoats. Take a look at the following instruction from a Minwax technical data sheet relating to their water-based polyurethane, Ultimate Floor Finish.

Before recoating, the instructions advise you to let your coats dry for at least two hours but less than 24 hours. If you observe this drying time, no sanding is required. However, if you miss the 24-hour window, you must lightly sand the coat with 220-grit sandpaper before applying the next coat.
The reason behind this relates to the curing process that polyurethane undergoes once applied. First, the water-based carrier liquid evaporates, leaving behind the urethane resins. These then begin hardening off when they come into contact with the air.
After 24 hours, the surface hardness and gloss have progressed to a stage that compromises adhesion with a further coat of polyurethane. If you apply the next coat within 2 to 24 hours, the drying coat can still merge with it, creating a good bond.
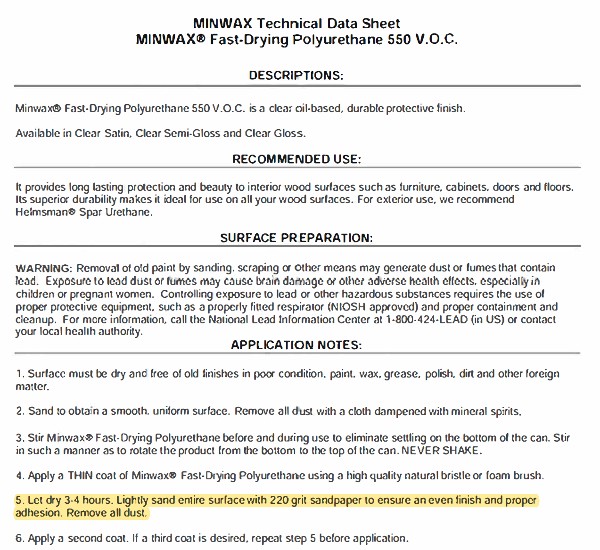
Oil-based polyurethanes are less fussy regarding when to apply the next coat, but most will require sanding between coats. Here’s an extract from the Minwax technical data sheet relating to their Fast-drying Polyurethane 550 VOC.

These instructions are very clear on the need to let a coat dry for 3 to 4 hours before lightly sanding the entire surface with 220-grit sandpaper. Note the words, “… to ensure an even finish and proper adhesion.”
The sanding requirement is because oil-based polyurethanes are great at sticking to anything except themselves. Using sandpaper, you break the surface gloss with very fine scratches, providing a ‘keying surface.’ Apart from removing any surface imperfections, it allows the next coat to chemically bond with the lower coat, creating a good bond and ensuring the longevity of the surface finish.
How to sand polyurethane between coats
- You must ensure the coat of polyurethane has dried to the point that you won’t damage the surface when you begin sanding. For oil and water-based polyurethane, I’d wait three to four hours, longer if the temperature is particularly cold. You might get away with two hours for water-based polyurethane, but I wouldn’t rush it.
- Use 220 grit sandpaper on a sanding block or a palm sander if it’s a flat surface or a sanding sponge for contoured surfaces. The sanding aims not to remove the coat you’ve just applied but to flatten the surface and abrade it lightly. Use light pressure and keep the sandpaper moving; don’t linger in one spot.
- Once you’ve sanded the whole surface, be sure to vacuum the surface and the surrounding area. Then, use a painter’s tack cloth to remove any last remaining traces of dust and dirt. Once the area is scrupulously clean, you can apply the next coat.
What grit sandpaper to use
You mustn’t use sandpaper that is too coarse. Large grit sizes will scour the surface, leaving large scratches that will show up darker under another coat of polyurethane. Using 220-grit or 240-grit is ideal.
Be sure to unclog the sandpaper occasionally by tapping it on your hand or against a worktable, as it can clog with polyurethane residue and reduce the cutting efficiency.
How much should you have to sand
You’re looking to knock the top off any brush marks, bubbles, or dust and grit. As you start sanding, you’ll notice the peaks of any marks will sand while the troughs will be untouched. In theory, you want to get an even sanding patina over the whole surface that shows you’ve flattened the surface right down.
If you’ve got a rough finish, that might take a bit of sanding. However, if you apply a thinned coat that isn’t too heavy, the amount of sanding is not too much more than if you were wiping down a dirty benchtop with a cloth. Remember, the point is to scuff the surface lightly. Go too hard, and you’re taking off everything you’ve just put on, which is a waste of time and money.
How long to let polyurethane dry before sanding
You should always read the manufacturer’s directions on the tin or go online and download a technical data sheet for the specific product you are using, as each product is different. However, water-based polyurethane is usually ready to recoat after 2 hours. Oil-based polyurethane will take almost twice that, so think 3 to 4 hours before you should consider sanding.
Remember that the manufacturers’ instructions base their drying times on an area with good ventilation, a temperature of 77o F, and a relative humidity of 50%. They also assume you have applied thin coats of their product. If you apply thick coats or work in colder temperatures or higher humidity, the drying time will take longer. If you begin sanding too early, you’ll drag a still-wet surface and ruin it.
I’ve written an article here that discusses the drying time of polyurethane in depth.
Related: How to Apply Polyurethane to Wood
FAQ
Can you sand polyurethane?
Yes, you can, but only sand the intermediate coats that will have another coat applied on top. Sanding lower coats ensures the adhesion of the next coat and removes any blemishes. Do not sand the final or topcoat.
Do you sand the final coat of polyurethane?
No. If you’ve sanded the lower coats, the final coat should flow on well, smooth out, and look great. Sanding it will only degrade the appearance. Leave the final coat to dry without sanding.
How many coats of polyurethane to apply?
If you’re applying oil-based polyurethane on a floor, use three coats, four maximum. If you’re using a water-based product on a floor, use five or six coats. Water-based polyurethane is very thin, and you need to apply 1.5 to 2 times more than you would an oil-based product. If the surface is not subject to heavy traffic, heat, or moisture, use two coats of oil-based product or three to four coats of water-based polyurethane.
For an in-depth article on this topic, go here.
How long to wait between coats
With water-based polyurethane, wait a minimum of two hours to a maximum of 12 hours before recoating. I advise four hours as a good rule of thumb. For oil-based polyurethane, wait four hours, but if it’s cold or damp, you might wait another hour or two.
Sanding Between Polyurethane Coats: Conclusion
There are two very sound reasons for sanding polyurethane between coats. The first is to ensure good adhesion between the coats, and the second is to remove any blemishes or marks and flatten the surface. While some polyurethane manufacturers say sanding is not required, they are talking about the adhesion issue, not the aesthetics.
In my opinion, the sanding process is not onerous and marks the difference between an OK finish and a high-quality one. Sanding a polyurethane that doesn’t need it won’t hurt the finish, but not sanding one that does need it will potentially shorten the life of the surface finish.
I hope you have all the information you need to transform your project with polyurethane. Thank you for reading, and good luck with your project.

