While applying polyurethane is easy, applying it to get a high-quality finish is a little harder. We are often asked how to fix a bad polyurethane job, so today, we’ll run through the most common mistakes people make when using polyurethane and how best to fix them.
I’ve used a lot of oil-based polyurethane in my time, and I well recall some of my early attempts. Full of bubbles, brush marks, and a cloudy appearance. Over the intervening years, I’ve learned what to do and what traps to avoid. I’ll run through those now.
Stay with me for a couple of minutes to learn why mistakes can happen, how to fix polyurethane mistakes, and how to apply polyurethane to avoid making similar mistakes in the future.
How to fix polyurethane mistakes
To fix a bad polyurethane job, you first need to sand down old polyurethane and re-apply the finish. To avoid repeating mistakes, thoroughly clean the surface before reapplying, get a high-quality brush, do not shake the can, and try to apply polyurethane at warmer temperatures.
How to remove dried polyurethane and reapply
The method of stripping back old polyurethane and reapplying the finish is the same in most circumstances. Here are the steps to follow. As we progress through the various mistakes that occur with a polyurethane finish, we’ll refer back to these steps while identifying any changes in application for the particular issue you seek to remedy.
- Use 220 to 340-grit sandpaper to sand the surface until the blemish or mistake has disappeared.
- Vacuum the surface and wipe with a painter’s tack cloth to remove all traces of dust and sandpaper grit.
- If you are using oil-based polyurethane, thin the first coat to a 50/50 ratio using mineral spirits. Do not shake; stir gently. Apply a light coat using just the tip of a brush, and allow it to dry. If using water-based polyurethane, you do not need to thin it. Apply the first coat lightly using the tip of a brush.
- Very lightly sand the dry coat. The aim is to scuff the surface, not remove it. This scuffing creates a keying surface for the next coat.
- Repeat step two before applying a further coat of polyurethane. If oil-based, thin to a 75/25 ratio of polyurethane to mineral spirits. If using water-based, do not thin.
- You can repeat step five to give the number of coats you seek. Do not sand the topcoat.
How to fix cloudy polyurethane
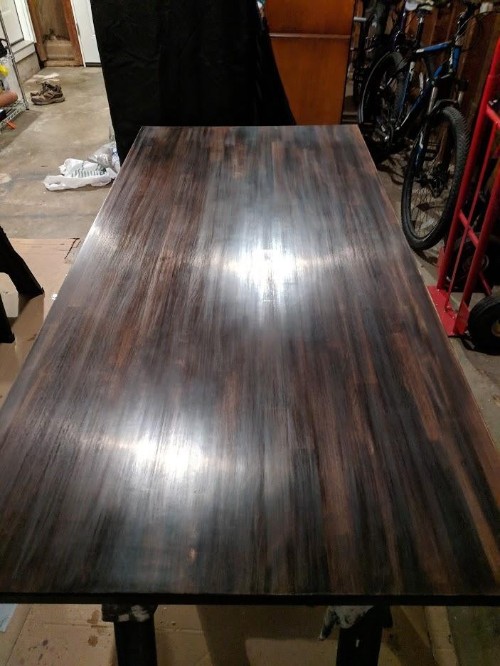
The primary reason polyurethane goes cloudy is moisture. It might be the humidity in the air, something wet has spilled on the surface, or the polyurethane was applied when the temperature was very hot or very cold. A less common reason is the age of the polyurethane that was used or the age of the polyurethane that was not stirred sufficiently before application. Sometimes if the polyurethane is applied over a stain or an oily timber, the stain or timber oils may be incompatible with the poly and cause a chemical blush.
Related: How Long to Let Stain Dry Before Polyurethane?
If you have a tabletop with water spilled on it and you have a cloudy patch, if you remove the water and let the tabletop dry, the stain sometimes disappears after a few hours. If not, you’ll need to follow the instructions above to remove and reapply the polyurethane with one possible change.
If you suspect the problem has been caused by the underlying stain or an oily timber, carry out steps one and two of the instructions above. Then, apply a sanding sealer. The sealer will seal the stain and timber to prevent leaching. Once dry, continue with the above instructions from step three.
How to fix uneven polyurethane finish
If the polyurethane has dried and looks uneven, with different thicknesses across the surface, the cause is usually the method of application or the technique used. Water-based polyurethane can be bad for this as it dries so quickly. Oil-based products take longer to dry and are more forgiving.
You get overlap when one area of polyurethane has dried, and you slightly overlap that dry area while applying finish to an adjacent area. You end up with a double thickness at that spot and a single thickness everywhere else. After multiple coats, this can become very noticeable.
You’ll need to sand the overlapped areas back to the same level as the surrounding area. Then, scuff sand the entire surface before applying a final light coat of polyurethane to everything. Follow steps one, five, and six of the instructions above, ensuring you level the unevenness as you sand.
How to remove streaks from polyurethane
Streaking in polyurethane has two main causes: using a cheap brush with coarse bristles during application or overworking the polyurethane when you apply it. Buy a high-quality natural bristle brush for oil-based polyurethane or a high-quality synthetic brush for water-based polyurethane.
Related: Oil vs Water-Based Polyurethane
Follow steps one to six of the above instructions for removing and reapplying polyurethane. Ensure you use the correct fine-bristled brush to apply the new coats, using only the first half-inch at the tip of the brush. Use light pressure with the brush angled ten degrees in the direction of travel, and if using oil-based polyurethane, be sure to thin it as directed.
Apply light coats of polyurethane and try not to go over and over the surface. Get the cover you want, then move on and let the polyurethane settle and flow to form a flat surface. If you go back over that drying surface again, you’re almost guaranteed to get streaking.
How to fix cracked polyurethane on wood
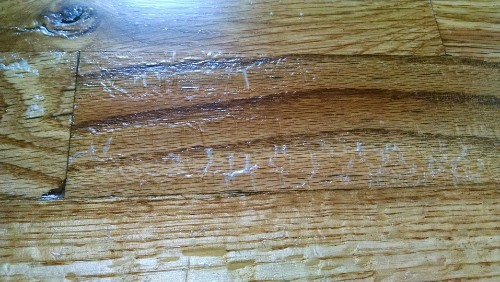
You’ll read a lot of advice telling you that denatured alcohol will soften polyurethane, allowing you to fix cracking and crazing. It’s never worked for me, and here’s why I think that is. Polyurethane cures in two steps; the first is the evaporation of the solvent, followed by a chemical reaction that occurs where the resins harden off in contact with oxygen.
While you can soften the resulting film with a paint stripper, denatured alcohol just doesn’t seem to work. I like to clean the cracked area with 0000 steel wool dipped in mineral spirits, then wipe it with clean mineral spirits and allow it to dry. Then, I will follow step five of the instructions for removing and reapplying polyurethane, which you’ll find above.
Once dry, lightly polish it with #0000 steel wool and buff it with a clean cloth.
How to fix peeling polyurethane
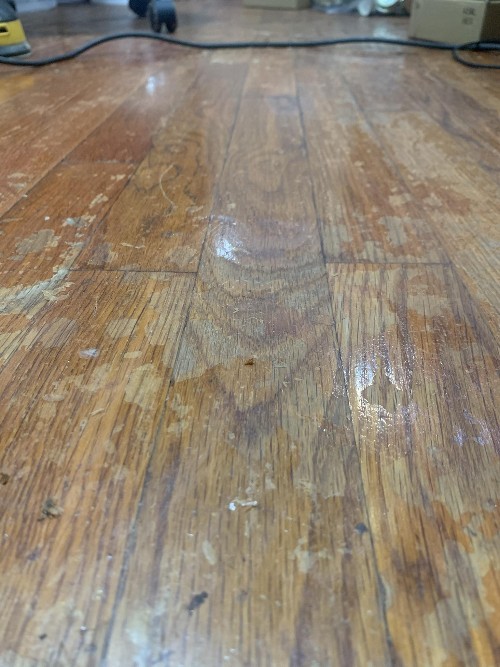
If you have polyurethane peeling off, there is usually one of three causes. Either the wood surface was not cleaned of oils and dirt before the polyurethane was applied, the polyurethane surface was not scuffed with sandpaper between coats, or the coats applied were too heavy.
The easiest way to solve this is to apply a paint stripper to the affected area, following the directions on the tin. Once softened, scrape off the polyurethane. Lightly sand the area using 320-grit sandpaper, then wipe over with mineral spirit and a lint-free cloth and allow to dry.
Now follow steps two through six of the instructions for removing and reapplying polyurethane, which you’ll find above.
How to repair scratches in polyurethane finish
A lot depends on the depth of scratching and what made the marks. If it’s light superficial scratching, you can use a buffer and a mildly abrasive polish to buff and restore the surface.
If the scratches are from sandpaper, you simply need to use a finer grade of sandpaper. Once you get to 320-grit, you can transfer to 0000 steel wool. Finally, buff the surface with some polish or wax.
Deep scratches that pierce the polyurethane film will need the surface finish restored. I like to polish these scratches with 0000 steel wool with a little mineral spirit. Then, I wipe the area dry with a cloth. Once fully dried, I apply two very light coats of polyurethane thinned with mineral spirits to a 50/50 ratio. Once fully dry, buff the surface again with 0000 steel wool before polishing the area.
How to fix bubbles in polyurethane finish
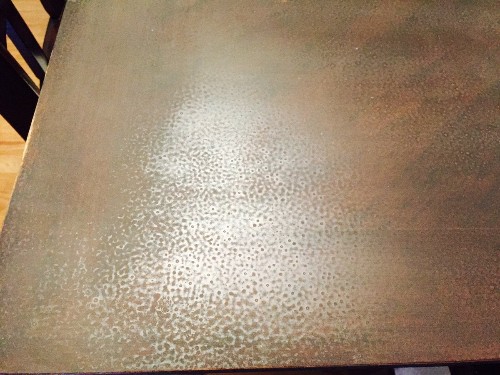
If the bubbles appear while you’re still applying the polyurethane, you can gently knock them down with the very tip of the brush, then brush very lightly over them before letting them level.
If the finish has dried, you’ll need to sand the area lightly to take the tops off the bubbles. Follow steps one through six of the instructions for removing and reapplying polyurethane, which you’ll find above. Be sure to apply the polyurethane in thinned coats; don’t overwork the area, and be gentle. Vigorous application adds air to the polyurethane, and you’ll have bubbles again.
Related: How Many Coats of Polyurethane to Apply
How to fix the polyurethane orange peel effect
The common cause of an orange-peel roughness to your polyurethane is due to the polyurethane drying before it has flowed and leveled. This effect often occurs when applying the finish in cold temperatures and usually when using a roller as an applicator.
You’ll need to sand the surface back until it’s flat and the orange peel effect is gone. Follow the six steps for applying polyurethane at the top of this article. It would be best if you tried to apply the polyurethane when the air temperature is warm, but that’s simply not possible in some parts of the world. If you have that problem, thin the polyurethane down so it’s less viscous. Use a ratio of 50/50 or 75/25 of polyurethane to mineral spirits.
Try to use a brush or a T-bar applicator if you’re finishing a floor. You can use a roller, but use a fine nap, lambswool for oil-based polyurethane, or microfiber for water-based polyurethane.
What to do if the polyurethane is still wet
It’s far easier to remove wet polyurethane and have another go than let it dry and need to sand it. If using water-based polyurethane, you’ll need to be quick as it dries so rapidly. The oil-based product takes a lot longer to dry, so you have some time.
Related: How Long Does it Take Polyurethane to Dry
Wet a sponge with the same product you’d use to thin the polyurethane. Use water for water-based polyurethane and mineral spirits for oil-based. Wrap a clean cloth around the sponge to form a pad, and wipe the polyurethane off. You’ll need to replace the clothes frequently, so have a few handy.
Once the polyurethane has been removed, wipe down the whole area to ensure it’s clean. Then, follow steps two through six of the steps above to reapply the required number of coats.
Tips for applying polyurethane correctly
- To avoid trapping air bubbles, stir the polyurethane gently with a stick. Do not shake the can. When decanting from the tin, be gentle.
- If using a brush, always get a high-quality one with fine bristles. Natural bristles are for water-based polyurethane, and synthetic bristles are for oil-based.
- If you’re using a roller to apply polyurethane, use a short napped cover, selecting lambswool for oil-based polyurethane and microfiber for water-based.
- Only use the first half-inch of the tip of the brush when applying polyurethane, and keep the brush at an angle of ten degrees to the direction of travel, using light pressure.
- Dip the brush into the tin of polyurethane, but do not wipe it against the side of the tin to remove excess. You’ll entrap air, which will end up in your finish. Allow the excess to drain back into the tin naturally before applying the brush to the wood.
- Do not go over and over the same area when applying polyurethane. Going back over the hardening film guarantees brush marks. Apply the coat, then move on, allowing the applied product to flow and level before drying.
- Always clean the surface of the wood before applying the polyurethane. Vacuum the surface, then wipe it down with a painter’s tack cloth to ensure all dust is gone.
- Oil-based polyurethane likes to stick to anything but itself, so sanding is a must to ensure good adhesion. Always lightly sand polyurethane between coats to create a keying surface. Vacuum and wipe down to remove the sanding dust.
- Always thin, oil-based polyurethane. It helps prevent bubbles and brush marks.
- Try to apply oil-based polyurethane when the temperature is high. It helps the surface to level before drying.
- Water-based polyurethane dries quickly, so be methodical and try not to overlap wet edges with dry edges, as you’ll get a double thickness and an uneven finish. Wet-edge to wet-edge is the best, and even then, try to be precise.
Related: How To Apply Polyurethane to Wood
F.A.Qs
How to tell if polyurethane is bad?
If oil-based polyurethane is cloudy or going jelly-like, dispose of it.
How to get a smooth finish with polyurethane?
Stir gently, thin oil-based polyurethane; do not overwork when applying, and apply when the surrounding temperature is warm. Work rapidly with a water-based product as it dries quickly.
Can you spray polyurethane?
Yes, it does come in cans for small areas; however, spraying large areas is best left to professionals as the overspray will cover everything and remain sticky for some time.
Will leftover polyurethane be kept?
Yes, it does keep for a long time, but the lid must be airtight. Skin may develop on the surface, but it should be removed before use. Once it gets bits floating in it or goes cloudy, dispose of it.
Summary
Applying polyurethane and achieving a high standard of finish requires observing some basic rules. My advice is to be patient and not rush the process. Allow each coat ample time to dry before sanding and applying the next. If I had to sum up four points to remember, it’s clean, gentle, light, and thin! I trust the tips we’ve provided have been useful. Good luck with your project.

