A table saw should be approached with a healthy level of fear and respect. While it is one of the most versatile tools in a woodworker’s arsenal, it can be dangerous when used without care. According to the National Center for Biotechnology Information, table saws cause over 30 thousand injuries each year in the United States alone, with kickbacks being one of the main causes of accidents. In this article, we will discuss the steps you can take to avoid kickback on your table saw.
In short, here are the 7 tips:
- Have Basic Safety Features In Place – Always use a riving knife or at least a splitter
- Do Not Crosscut With The Rip Fence – Instead, use a miter gauge or a crosscut sled
- Use A Push Stick – This will give you better control and keep your hands away from the blade
- Do Not Cut Crooked Stock – Crooked boards can be dangerous to work with on a table saw
- Check Your Blade – Maintain your blade and make sure it’s sharp and straight
- Be Attentive – Stay alert when working on a table saw
What Is Table Saw Kickback?
Table saw kickback usually occurs under these sets of circumstances:
- A board can kick back during a rip cut when it goes halfway through the saw, and the kerf starts pinching the blade. At best, this will lead to the stalling of the saw. If your table saw is powerful enough, the blade can propel the board right at you or flip it up and hit you in the face.
- A workpiece can also get stuck between the rip fence and the back of the blade. As the blade spins, it can throw the workpiece back at you. Avoid this by making sure that the fence of your table saw is perfectly aligned in relation to the blade.
- When a piece of wood makes contact with a tooth at the back of the blade, it then gets lifted up on top of the blade and thrown back at you with great force. Worst of all, your hand can get drawn into the blade and cause an amputation. This happens way faster than you can react.
How to avoid kickback on a table saw
Follow these tips to reduce the risk of hurting yourself from kickback on a table saw.
1. Have basic safety features in place
Nowadays, all table saws come equipped with safety features that are designed to keep you out of harm’s way.
One of those features is a riving knife. A riving knife is a piece of metal that stays close to the teeth at the back of the blade. It prevents the workpiece from pinching the blade or touching its teeth on the back. The good thing about it is that it goes up and down together with the blade, providing support regardless of the height at which the blade is set.
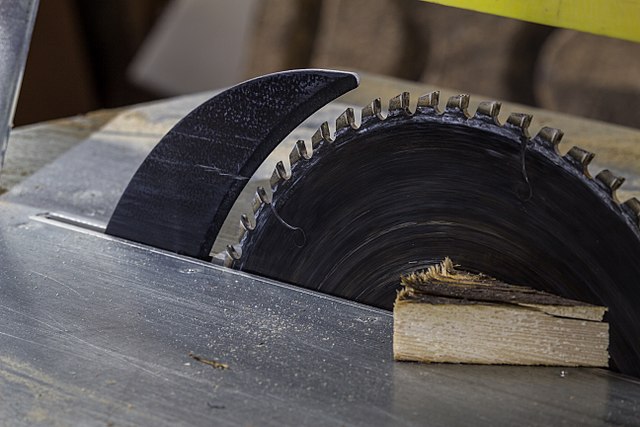
A riving knife should be installed at all times, even if you are just making singular cuts. The only time when you should remove the riving knife is when you use a dado set. Fortunately, as per Underwriters Laboratories UL 987 Standard for Stationary and Fixed Power Tools, all table saws produced after 2008 must be fitted with riving knives that rise and fall with the blade.
For older saws, you will want to at least use an insert with a splitter that will act similar to a riving knife and keep the workpiece from squeezing the blade. Splitters are not as effective as riving knives, though, because they don’t rise or go down as you adjust the blade height.
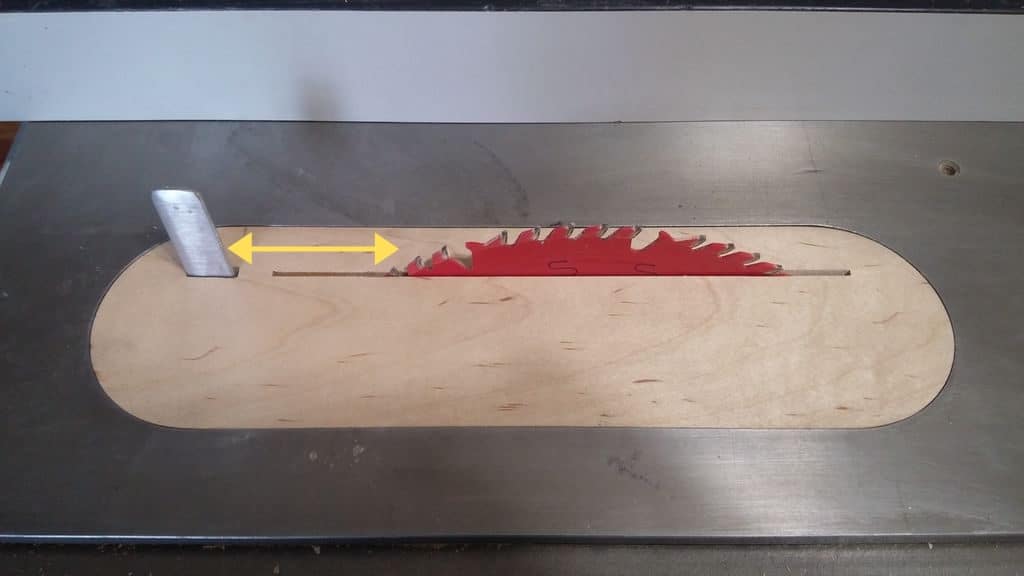
As you can see in the image above, lowering the blade will create a very wide gap between the blade and the splitter. This way, your workpiece can get caught by the blade on the end.
The blade guard is another piece of safety equipment that was created to reduce the chances of getting hurt. A common misconception is that the purpose of a blade guard is to keep your fingers from touching the blade. While it does act as a reminder to keep your hands away, the blade guard is actually designed to keep you from dropping the workpiece on top of the blade.
Some woodworkers tend to remove the blade guard as it can obscure the view and lead to inaccurate cuts. If you are yet to get the hang of how to correctly operate a table saw, you should better keep the blade guard on.
2. Never Make Free-Hand Cuts
Free-hand table saw cuts are only made by stupid people in stupid TV commercials. There should be no free-hand table saw cuts in your workshop. For a reason, all table saws come equipped with rip fences and miter gauges. For rip cuts, you have a rip fence to support your stock while you push it through the blade. A miter gauge works as a support to help you make crosscuts.
With that being said, do not crosscut using the miter gauge and the rip fence at the same time. If you do that, your workpiece can get jammed and cause kickback. This leads us to rule #3.
3. Do not Crosscut With The Rip Fence
We value the table saw because it allows us to easily make rip cuts. But what if you need to make a few quick crosscuts to cut a board into several pieces of identical length? If that’s the case, do NOT use the rip fence as a supporting barrier for crosscutting.
If you do that, the workpiece can get stuck between the fence and the blade. As we’ve discussed earlier, this can lead to the board getting thrown back at you by the spinning blade. The problem can get exacerbated even further if your fence is out of alignment with the blade, pushing the workpiece onto the back of the blade and lifting it up.
You also have to understand the dynamics of the dimensions of your workpiece if you crosscut and use the fence as support. Basically, the width of the board (i.e., the distance between the blade and the fence) cannot exceed its length.
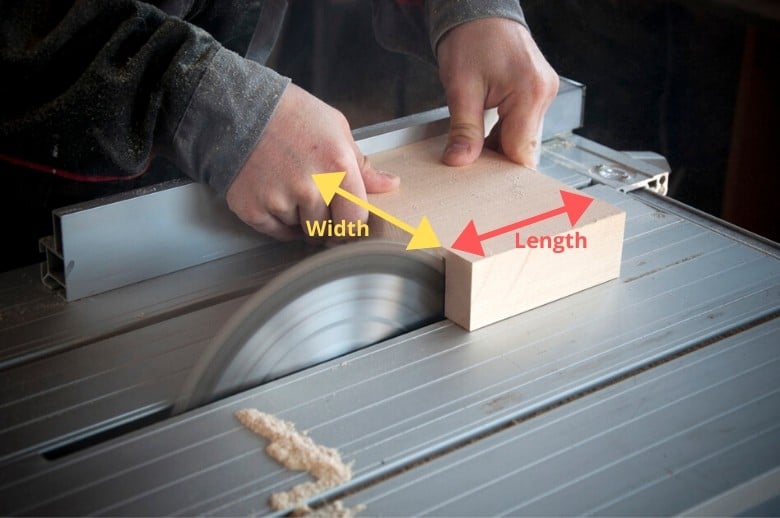
If the length of the board is lesser than its width, the torque generated by the blade can cause the workpiece to spin towards the back of the blade. Kickback is actually the least bad thing that can happen here. What’s worse, your hands can get drawn into the blade, which will lead to an amputation.
There are many ways to safely crosscut using a table saw. You can clamp a stop block to the fence for accurate measurement of length and use the miter gauge to guide your stock through the blade. This way, you eliminate the risk of your workpiece getting squeezed between the fence and the blade.
Another popular option is building a crosscut sled. A crosscut sled is a moving platform that you insert into the miter slots to guide your workpiece through the blade. This is by far the safest, fastest, and most convenient method of crosscutting on a table saw.
4. Use A Push Stick
Truth be told, no single measure will give you 100% protection from kickback. With that said, it is smart to use a push stick or a push block whenever you make a cut. A push stick will keep your hands further away from the blade. In case kickback does happen, you can be sure that your hand won’t get drawn into the blade. Additionally, a push stick itself will act as a kickback countermeasure because it gives you better control of the stock.
Now, there are a few things you have to know about using a push stick. First of all, place the stick in the middle of the board. Pushing the stock on the side can make it twist and move towards the back of the blade. Apply more force towards the side of the fence and not towards the blade when pushing stock.
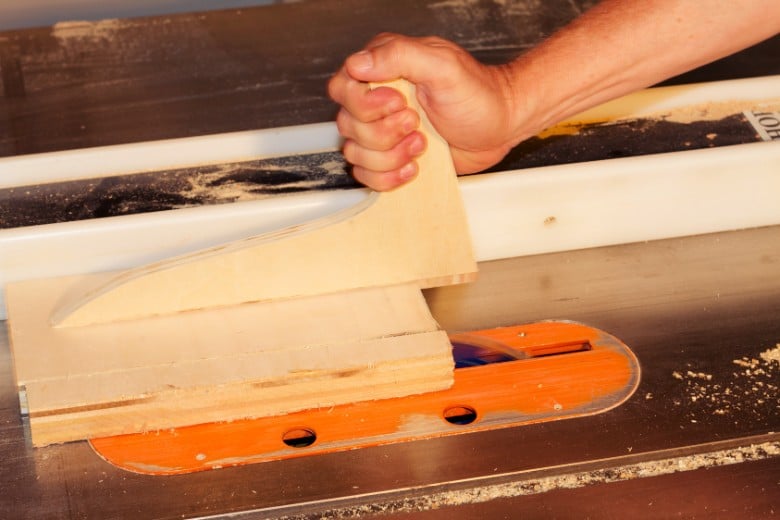
Take special care when pushing wood that is hanging off the side of the table saw. Do not apply downward pressure to the end of the stock. This can cause it to rise on the other side, get lifted up by the back teeth of the blade, and smack you in the face. You can even use two push sticks to guide the board on both ends.
5. Do not cut crooked stock
The uneven surface of the board does not allow for continuous contact with the rip fence or miter gauge. As the saw goes through the crooked grain, this can release pressure at the spot where the board is warped, crooked, or twisted, then press on the blade and cause kickback. Additionally, take extra care when working with boards that have a lot of knots, as they can also lead to pinching of the blade.
6. Check your blade
A dull saw is an unsafe saw. A dull blade will have trouble with cutting stock, which will lead to overheating and warping. This leads to misalignment between the blade and the fence. In short, never use a blade that is broken or warped.
7. Be Attentive
When you don’t feel your best, be it due to a common cold, a bad night’s sleep, or getting cut off (no pun intended) by some a-hole on the road, don’t touch the table saw. Personally, when I don’t feel like I’m in my best shape, physically or mentally, I tend to stay away from any tools that can make me lose my appendages.
Imagine your cut before you make it. Visualize the movement trajectory of your workpiece and have a plan to push it all the way through the blade. If the cut feels weird, don’t do it. Take a step back and come up with a way to complete the cut safely. Do not stand in an awkward position where you may lose your balance.
Anticipate how the dimensions of your workpiece and your method of guiding it through the saw can lead to kickback. Don’t let your guard down, and be attentive. If you feel sleepy or groggy, allow yourself some rest and return to the workshop tomorrow.
The Final Kick
Kickback is by far the most dangerous event that can occur on a table saw. Without proper care, you can get hit with a flying piece of wood or get severely hurt by a spinning blade. It is paramount that you do everything possible to prevent kickbacks from happening.
Following the steps in this guide should help you reduce the risk of kickback in your workshop. I really hope you follow these steps and make a conscious effort to maximize the table saw safety when woodworking.
Got any other tips? Make sure to let me know in the comments!

